Connecting to the RCE using NX4
Ready to get started? Follow the menu items on the left to learn how to install, configure and use HMDC's Research Computing Environment, powered by NoMachine NX4 and HTCondor.
01 How to Connect and Use the Web Client
An exciting feature of the RCE environment, is the ability to access your desktop and your jobs through your web browser.
Accessing the RCE via HTTP
| Open your preferred web browser and navigate to https://rce.hmdc.harvard.edu. Enter your username and password, and click OK. |  |
| If you have an already running session, highlight your session and click Connect. Otherwise, start a new session. The web interface completely mirrors the NoMachine client interface. |  |
Why use the NoMachine Desktop Client at all?
You may find yourself using the Web client interface to access your RCE session, rather than the NoMachine Desktop client. Great! However, if you need to print documents or connect a USB storage device to your RCE session, you must use the NoMachine NX4 Desktop client. If you never need to print or access USB storage from RCE, ditch the NoMachine NX4 Desktop client and enjoy the HMDC supported NoMachine NX4 Web client interface!
02a How to Install the Desktop Client
|
Download the NoMachine client for your OS: Please download the NoMachine client from HMDC; it provides a superior RCE experience. Our support staff will ask you to download and install our version if you encounter difficulties using the RCE. Windows zipfile |
 |
| Navigate to the location where you downloaded the NoMachine package file (typically in 'Downloads') and double-click on it. |  |
| You should be presented with the following window. Double-click on NoMachine.pkg. |  |
| Click Continue |  |
| Click Continue |  |
| Click Agree |  |
| Click Install |  |
| If requested, type your password and click Install Software |  |
| Click Close |  |
02b How to Configure the Desktop Client
Option 1: Automatic Configuration
| Download the HMDC NoMachine Configuration ZIP file | |
| Extract the HMDC NoMachine Shortcut to your Desktop | |
| Double-click on the HMDC NoMachine Shortcut |  |
| If you have OpenNX installed as well, you may have to select Open With NoMachine. |  |
Option 2: Manual Configuration
| Run NoMachine from the Applications menu in Mac OS X or from the Start menu in Windows |  |
| Click Continue. Check Don't show this message again if you want to skip this prompt next time you start NoMachine. |  |
| Click Click here to create a new connection |  |
| Select NX from the dropdown box and click Continue |  |
| In the Host field, type rceweb.hmdc.harvard.edu as shown and click Continue. Make sure the port field reads 4000. |
 |
| Check Use the system login and click continue |  |
| Check Password and click Continue |  |
| Check Don't use a proxy and click Continue |  |
| In the Name field, type RCE6 and check Create a link on the Desktop. Then, click Done. |  |
02c How to Use the Desktop Client
| Highlight the connection you previously configured, RCE, and click Connect |  |
| Enter your RCE username and password and click OK |  |
| If you have no sessions running, click New virtual desktop or custom session. If you have a session running, skip to Resuming a session. You should always resume your sessions rather than creating multiple sessions. |  |
| Click Create a new virtual desktop and click Continue |  |
| Read the on-screen instructions and click OK through each subsequent screen. Check Don't show this message again if you would not like to see these instructions again. |  |
| You should see your RCE desktop. Congratulations, you are now using NoMachine NX4 to use the RCE environment! |  |
Resuming a Session
| If you already have a session listed, highlight your session listed and click connect. |  |
| You will then be greeted with your RCE desktop |  |
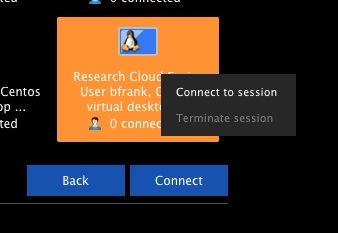
03 Desktop sharing with others
Click "My Desktop" button after logging into NX, to see other user sessions

Search and right click, and click "Connect to session" then "Connect" on the session you're trying to connect to --in this case user bfrank
The user will then be prompted to Accept my request to connect

04 How to Share Local Storage (Desktop Client only)
Windows users:
Right click on Start, and click Windows Explorer, and browse to the folder you want to share. Right click on Properties and go to the Sharing tab. Select Advanced Sharing, and check the box Share this Folder.
Mac users
select System Preferences->Sharing->File Sharing
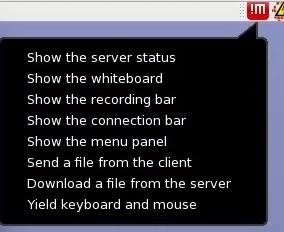
Login to the RCE, and Select "Show the menu panel" in the top right corner of your session
Click "Devices"
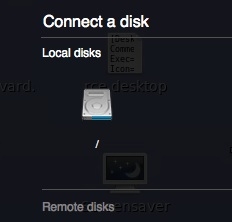
Select Connect a Disk
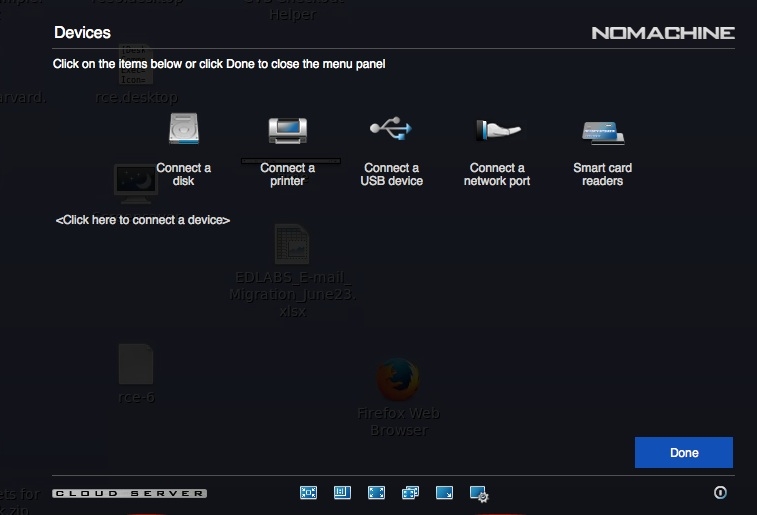
Select Local Disk as "/" if on a Mac -- or C: if on Windows
Export as root and connect
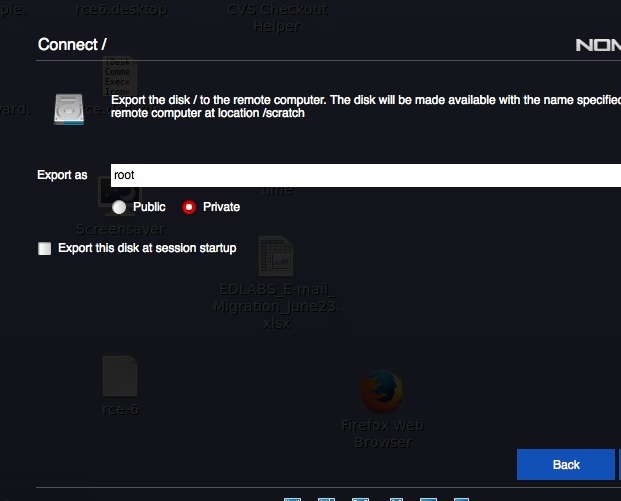
It should automatically appear on the desktop of your RCE session as "Connected Disks." Or, you can open a terminal and find it mounted under /mnt/user_shared/$username
05 How to Add Printers (Desktop client only)
Do you need to print from applications in the RCE? NoMachine NX4 allows you to attach any printer to a currently running RCE desktop. Printing from the RCE with NX4 is as simple as printing on your local desktop. Just click Print. First, you need to attach a printer to your RCE Desktop in the NoMachine NX4 client. Please note that printer sharing only works from the NoMachine NX4 desktop client, not the mobile client or the web client.
Setting Up Printer Sharing in Mac OS X |
|
|
Click the Apple logo in the upper left hand corner of your screen and select System Preferences |
 |
| Click the Sharing button |  |
|
Click the lock on the bottom left of the window to unlock your sharing preferences and enter your administrative password. You should see a number of printers listed with unchecked checkboxes. If you see no printers listed, you haven't configured any printers. Please add a printer, first. If you don't know how to add a printer, mail support@help.hmdc.harvard.edu. |
 |
| Click the On checkbox for Printer Sharing on the left side of the window. Then, click the checkboxes for each printer you want to use inside the RCE Desktop environment as shown. |
 |
| For each printer you want to share, click the + button, highlight yourself, and click Select. |  |
| You should now see that Printer Sharing is checked On, the printers you wish to share with your RCE desktop are also checked, and that your username Can Print while 'Everyone' has no access. |  |
Setting Up Printer Sharing in Windows |
|
Click the Start button and select Control Panel. Then, click View devices and printers.
|
 |
Double-click on the printer you want to share with RCE6.
|
 |
Click Customize your Printer |
 |
Click the Sharing tab. Check Share this printer. Click OK.
|
 |
Connecting a printer to your RCE Desktop |
|
| Once completed, click the Lock and exit the screen by clicking the X button on the upper left hand corner of the screen. Open your RCE6 session by clicking on the RCE6 icon on your desktop which you set up earlier. |  |
| On the top right-side of your RCE desktop, click the !M button and select Show the menu panel. |  |
| Click Devices |  |
| Click Connect a printer. |
 |
| Select the printer you wish to connect. Click Done. |  |
| Make sure to select the Private radio button, otherwise all NX4 users will be able to print directly to your device. If you're going to use this printer for every RCE session, you may check Make this the default printer and Export this printer at session startup. Then, click Connect. |
 |
| If you see a checkmark next to your printer icon and a green indicator, you're done. Your printer is connected. Continue to click Done until you return to your desktop. |  |
| Open a document or a web browser and attempt to print. When selecting Print from an RCE launched browser like Google Chrome, you should see your printer in the list. |  |
06 How to suspend or terminate my RCE (NX) session
To suspend your session close the browser tab, or browser window. In the case of the desktop client you can simply close the window. You can also Go to the Nomachine Menu Panel and click the disconnect icon in the bottom right of the page.
If you need to terminate your session, please follow these instruction in our FAQ: Terminate NX4 Session
What's new with NX4
- Access the RCE through a web browser instead of the nx client
- File upload download to the RCE from within nx -- no sftp client needed
- Desktop session sharing: you can now share your session with other users
- Connect to your local printers through your session
- Connect to your local hard drive from within your session